Wednesday, July 28, 2010

Harry Potter and the Deathly Hallows


Harry Potter and the Deathly Hallows: Part I hits theaters on November 19th, 2010.

Cast: Daniel Radcliffe, Rupert Grint, Emma Watson, Tom Felton,  Ralph Fiennes ,Alan Rickman, Bill Nighy, Jamie Campbell Bower, Bonnie Wright, Helena Bonham Carter, Timothy Spall, Michael Gambon, Rhys Ifans, Maggie Smith, John Hurt, Jason Isaacs, Ciaran Hind

Part 1 begins as Harry, Ron and Hermione set out on their perilous mission to track down and destroy the secret to Voldemort's immortality and destruction-the Horcruxes. On their own, without the guidance of their professors or the protection of Professor Dumbledore, the three friends must now rely on one another more than ever. But there are Dark Forces in their midst that threaten to tear them apart.

Meanwhile, the wizarding world has become a dangerous place for all enemies of the Dark Lord. The long-feared war has begun and Voldemort's Death Eaters seize control of the Ministry of Magic and even Hogwarts, terrorizing and arresting anyone who might oppose them. But the one prize they still seek is the one most valuable to Voldemort: Harry Potter. The Chosen One has become the hunted one as the Death Eaters search for Harry with orders to bring him to Voldemort... alive.

Harry's only hope is to find the Horcruxes before Voldemort finds him. But as he searches for clues, he uncovers an old and almost forgotten tale-the legend of the Deathly Hallows. And if the legend turns out to be true, it could give Voldemort the ultimate power he seeks.

Little does Harry know that his future has already been decided by his past when, on that fateful day, he became "the Boy Who Lived." No longer just a boy, Harry Potter is drawing ever closer to the task for which he has been preparing since the day he first stepped into Hogwarts: the ultimate battle with Voldemort.

Harry Potter and the Deathly Hallows trailer courtesy Warner Bros. Pictures.

Saturday, July 24, 2010

Adding counter to blogspot

Blogger / Blogspot
StatCounter provides free customisable hit counters, visitor tracking, web analytics and website stats for Blogger / Blogspot. You simply need to:
  1. Sign up for a free account at StatCounter and 
  2. follow the 'Install Code' wizard to generate your StatCounter code.
  3. When prompted, make sure to choose Blogger / Blogspot as your Blog/Web Page Editor from the drop down list.
  4. Copy the StatCounter code.
  5. Log into your Blogger / Blogspot blog.
  6. Go to the layout area

.
Click one of the “Add a Gadget” to the right of your blog layout area (as indicated in the picture). (Note from the screenshot that we are in the “Page Elements” tab of the “Layout” area.)


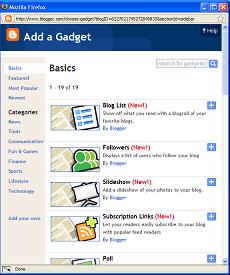
  1. Clicking “Add a Gadget” opens a new window similar to the one pictured below.

    Blogger - Add a Gadget Window
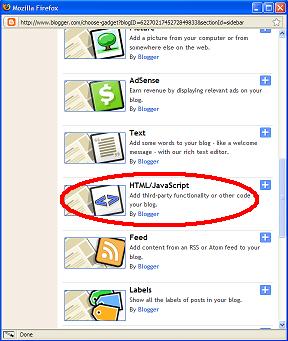
  2. Scroll down through the list of Basic gadgets to find the HTML/Javascript gadget as shown in the picture below. Click the text (that says HTML/JavaScript) to add the gadget to your blog.

    Blogger - HTML/Javascript Gadget
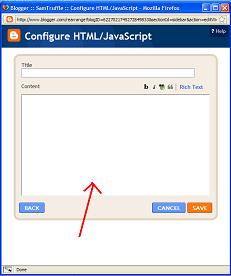
  3. Paste the StatCounter code into the content section of the gadget.

    Blogger - HTML/Javascript Gadget
  4. Click "Save" and that's it!

Create Pages in Blogger

Another top user-requested feature has just graduated from Blogger In Draft! Blogger now makes it easy to create Pages linked from your blog. 

This feature lets you easily publish static information on stand-alone pages. For example, you can create an About This Blog page that discusses the evolution of your blog, or a Contact Me page that provides directions, a phone number, and a map to your location.

You create a page similar to how you write a blog post. From Blogger click the Posting | Edit Pages tab, then click New Page. (Note: you can create up to 10 pages.)


Once your page is published, you can link to it from the new Pages widget. The Pages widget lets you add links to your pages as tabs at the top of your blog, or as links in your blog's sidebar.


In the Pages widget, you can decide which pages will be linked and in what order they will appear. You can also choose whether you want new pages to appear automatically in the Pages widget by checking or unchecking the box to the left of Add new Pages by default.

Finally, for those of you that have custom templates, your custom template may not automatically support Pages as horizontal "tabs". If you are familiar with HTML, follow these instructions on how to add Pages to your custom template.

Looking forward to seeing all of the Pages that bloggers create!

Get Related Content for Your Blog with the Zemanta Gadget

About a year ago this blog featured Zemanta, a tool that helps you get more out of blogging. Previously, Blogger users could install a Zemanta browser plugin to recommend content while you blog, enabling you to:

  • Read news to learn more about the topic
  • Link articles to improve the value of your post
  • Use pictures to make your post richer
Today we are pleased to announce that we've teamed up with Blogger to make it easier to use Zemanta on Blogger. To use Zemanta, just follow these three easy steps:

1. Click this link: Add Zemanta gadget. It will take you to a page to add the Zemanta gadget to your blog:


2. Select one of your blogs in the drop-down box, and click Add Zemanta. This will add the gadget to the post editor for your selected blog, and take you to a new post page.

3. You will see Zemanta is already turned on, waiting for you to start using it.


That's it! You are now all set up to boost your blogging. Simply write a couple of sentences and the recommendations will show up automatically. You can preview them and then simply click on an item to add it to the post.

To learn more about how best to use Zemanta, check out this video, browse through our tutorials, read about our selection as one of ReadWriteWeb's "Top 10 Semantic Web products" last year, or just get started and play around with it. We would love to hear your feedback or suggestions.

Happy blogging!

Apple Launches Free iPhone 4 Case Program


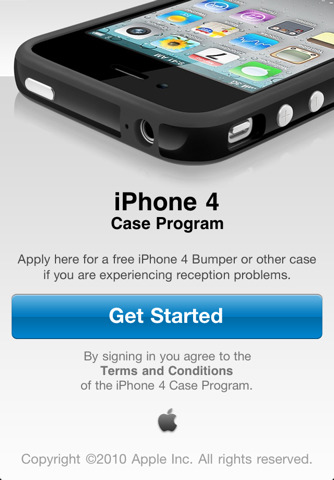
Apple has launched their iPhone 4 case program on their site at http://www.apple.com/iphone/case-program/. The program offers iPhone 4 customers an App Store App that lets them apply for their free iPhone 4 bumper case.

1. Download the iPhone 4 Case Program app from the App Store.

2. Launch the app on your iPhone 4 and sign in using your iTunes Store account or Apple ID.

3. Select your Bumper or case.


For iPhone 4 purchases made before July 23, 2010, you must apply no later than August 22, 2010; otherwise, you must apply within 30 days of your iPhone 4 purchase. To qualify for this program, you must purchase your iPhone 4 by September 30, 2010.


For existing customers who have already purchased an iPhone 4 bumper case, Apple also provides instructions. All credit card customers should already be seeing refunds, while those who paid with Cash, Check or Gift card at retail stores will need to bring their receipt back to the Apple Store.

Thursday, July 22, 2010

muralidharan takes 800 th test wicket video

congrats murali for taking 800 test wicket
The time has finally come - mark it on your diaries - the date and time - 22/07/10 at 1:54 PM, when Murali got his 800th Test wicket!
This videos has been posted just minutes after history has been made

Wednesday, July 21, 2010

Gmail Rolled Out Rich Text Signatures Feature

Gmail introduces one of the most demanding feature for long time, rich text signatures. It means you can insert images, text, colors, change fonts size and do many more things in Gmail signature interface. Now you don’t need any scripts and add-ons to insert rich signatures.
To inset the signature, go to settings –> General –> Signatures. Now choose the signature option and type the text inside the box. You can insert small images (logo of your blog or website) or icons for your social media profiles. After inserting the image, hyperlink it by clicking the link tool. Click on “Save settings” button at the bottom of the page.

You need to activate the “Inserting image” lab feature to insert image inside the signatures. One feature still missing is inserting image through your computer. You have to upload the photo to picasa or Flickr profile first and then through its URL, you can insert images inside signature.
However, there is a workaround for this one. Go to compose mail in Gmail. Write your signature, you can insert your computer’s image inside the mail. Now copy the signature and paste it to the signature area in the Gmail settings. That’s all. You don’t need to upload the image on any site.


If you have more than one account to your Gmail account, then you can make a separate signature for other Gmail ID. Click on the email ID drop down menu and select the different mail account.

How To Decrease The Boot Up Time of Windows PC

While starting Windows PC, many programs are set to start along with boot up process. This happens because while installing the program you generally check the option, start with system startup. Sometimes it is useful but sometimes it turns out to be reason to worry.
Programs like Adobe reader, Google updater, messengers (MSN, Yahoo) and many more opens in the background and of no use. It’s better to move them out of the list. We use Msconfig for that purpose. Msconfig is a system configuration utility which can disable unnecessary programs to startup while Windows starts.
1. If you are a Windows Vista or Windows 7 user then click on the start button on the bottom left and type msconfig in the search box. Click on the result.


If you are Windows XP, 2000 user then go to Run panel (use “Ctrl+R” to open Run panel) and then type msconfig inside the box. Then click OK.


2. In the system configuration window, go to “Startup” tab. It will show you all the startup programs along with the name of manufacturer and location.


3. Uncheck all the boxes next to program name which you don’t want to include in the startup process.


Note: There are some programs which are necessary to run during starting up Windows therefore don’t disable such programs for which you are not sure about.
4. After uncheck the boxes, click on the OK button. A small window will appear ask you to Restart the system. Click on Restart if you want to apply the settings immediately. If you don’t want to restart your system immediately then click on “Exit without restart” button. The settings will be applied when next time you’ll restart your system.
 

That’s how you can decrease in the boot up time and improve the speed of your PC using Msconfig.

Tuesday, July 20, 2010

Priyadarshan and Akshay Kumar is ready to rock bollywood with Khatta Meetha

Khatta Meetha is a forthcoming Hindi movie directed by Priyadarshan which will star Akshay Kumar & Trisha Krishnan in the lead roles. It will be a satirical comedy film. Khatta Meetha is scheduled to be released on July 23, 2010. The Movie will have 6 songs by Pritam.

Khatta Meeta is a remake of the 1989 Malayalam film, Vellanakalude Nadu, scripted by Sreenivasan, also directed by Priyadarshan and starring Mohanlal, Shobana, Nedumudi Venu, Sreenivasan etc.

The Only question is will akshay kumar able to make same impact that south indian super star Mohanlal had made in Kerala?


Trailor's: